WooCommerce is one of the most popular eCommerce platforms, offering flexibility and customization for online store owners. One powerful feature is the ability to customize the checkout process, including adding a custom field to WooCommerce checkout. Whether you want to collect additional customer information or enhance the user experience, this guide will walk you through every step of the process.
Why Add a Custom Field to WooCommerce Checkout?
Adding a custom field to WooCommerce checkout can provide several benefits for your store:
- Collect Specific Information: Gather details like delivery preferences, gift messages, or additional contact information.
- Improve User Experience: Tailor the checkout process to meet your customers’ unique needs.
- Enhance Data Collection: Capture valuable insights for marketing, personalization, or analytics.
- Boost Conversion Rates: Simplify processes by asking for only relevant information at checkout.
Types of Custom Fields You Can Add
Before diving into the implementation, consider the type of custom field you want to add:
- Text Fields: For simple inputs like names or messages.
- Dropdowns: Useful for predefined options like shipping preferences.
- Checkboxes: Ideal for consent or optional add-ons.
- Date Pickers: To schedule deliveries or appointments.
- Radio Buttons: For multiple-choice options.
Methods to Add a Custom Field to WooCommerce Checkout
You can add a custom field to WooCommerce checkout using one of these methods:
- With Custom Code (via functions.php)
- Using a Plugin
- With a Page Builder
Each method has its pros and cons. Let’s explore these in detail.
Method 1: Add a Custom Field to WooCommerce Checkout Using Custom Code
For those comfortable with coding, adding a custom field manually is the most flexible approach.
Step 1: Open the functions.php File
Navigate to your WordPress admin panel, then go to: Appearance > Theme Editor > functions.php
Tip: Use a child theme to prevent your changes from being overwritten during updates.
Step 2: Add the Custom Field
Insert the following code into your functions.php file:
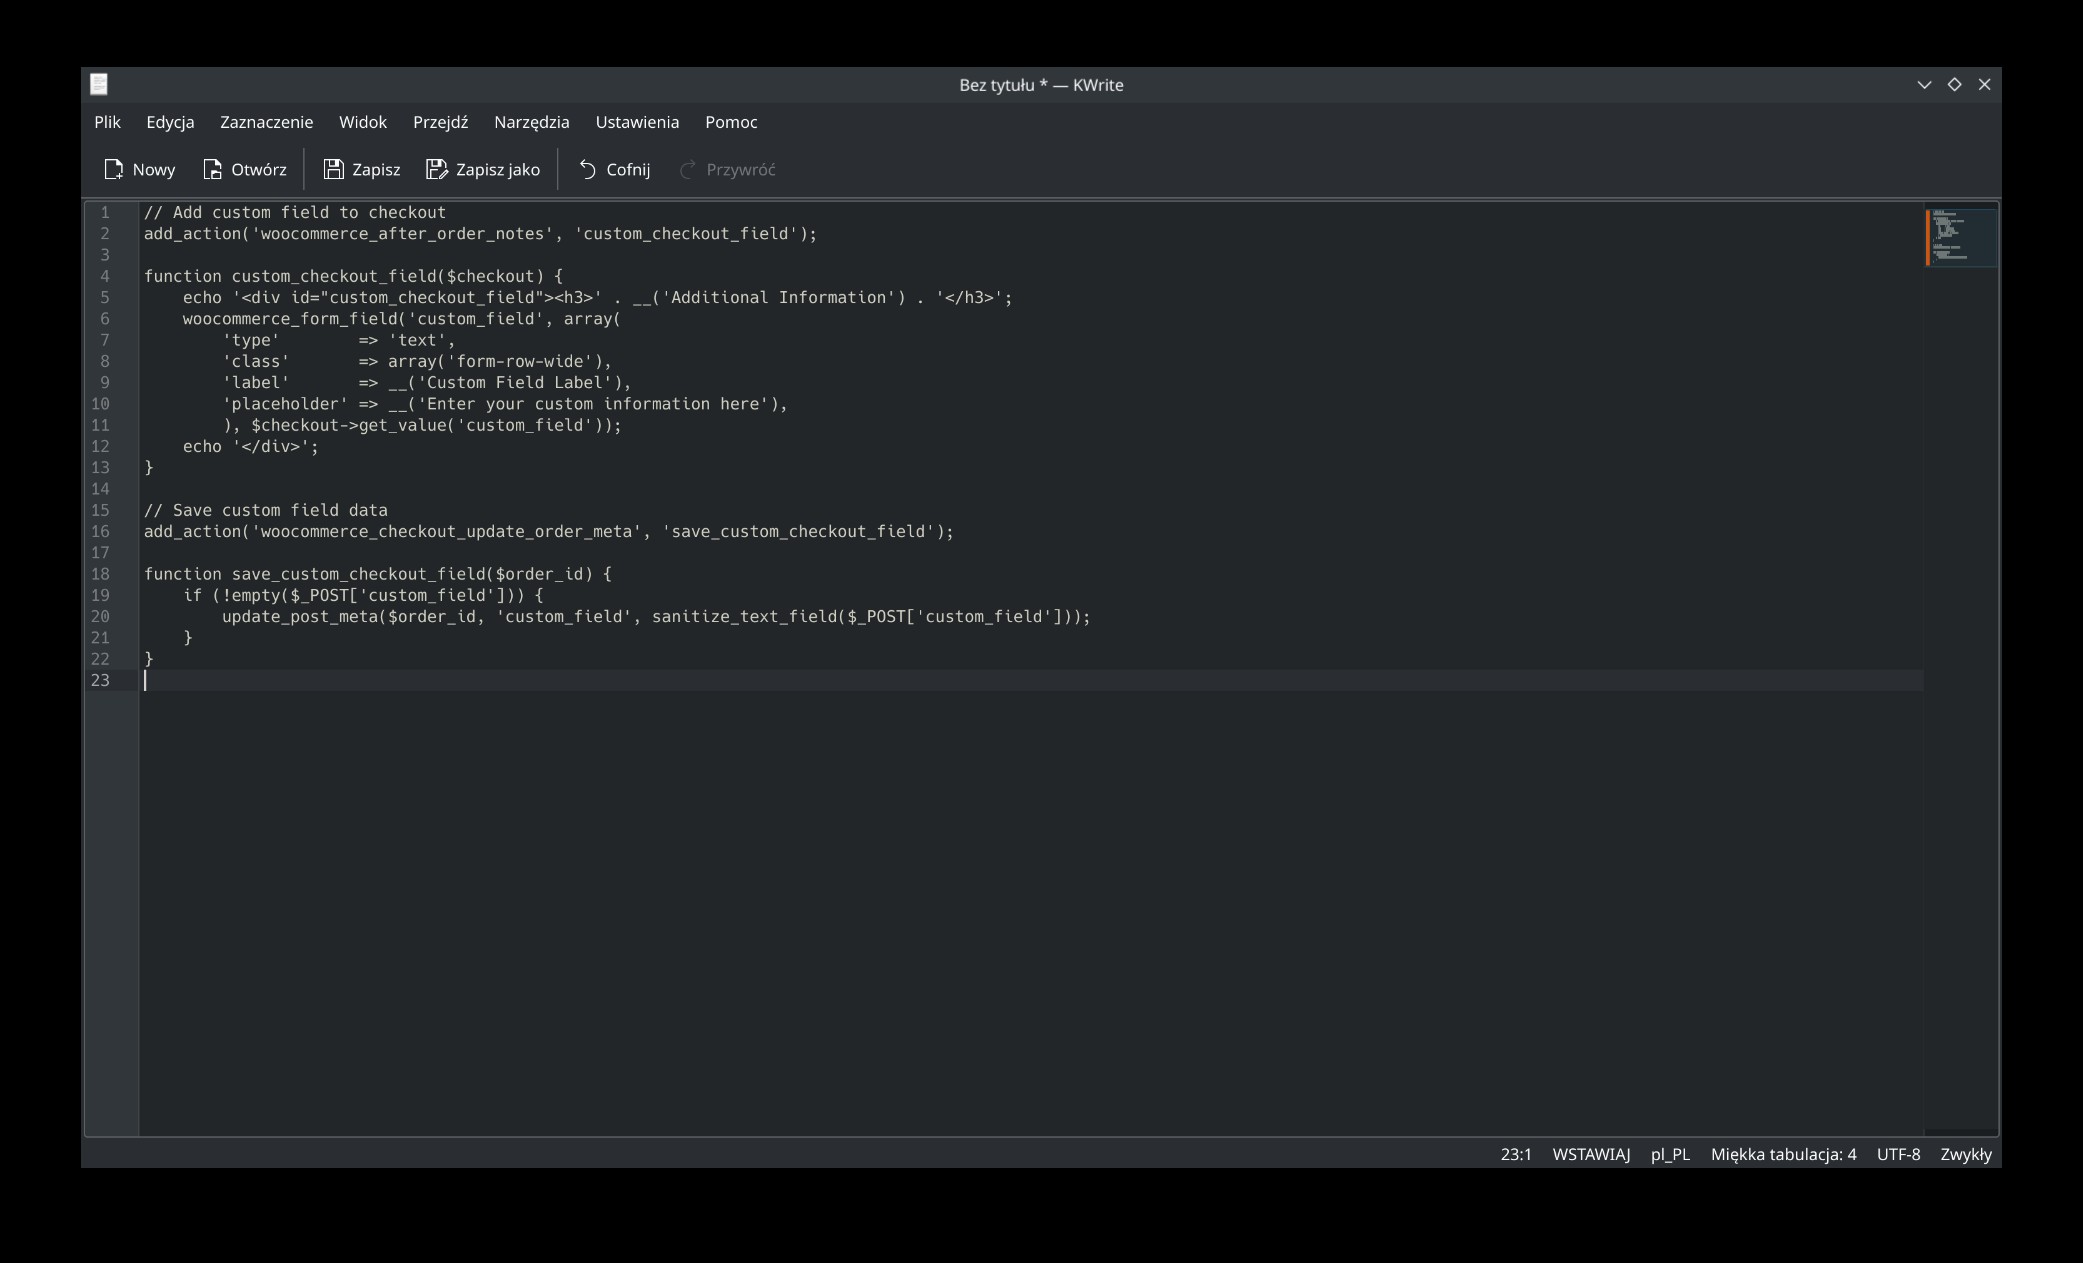
This code:
- Adds the field to the checkout page.
- Saves the field data in the order meta.
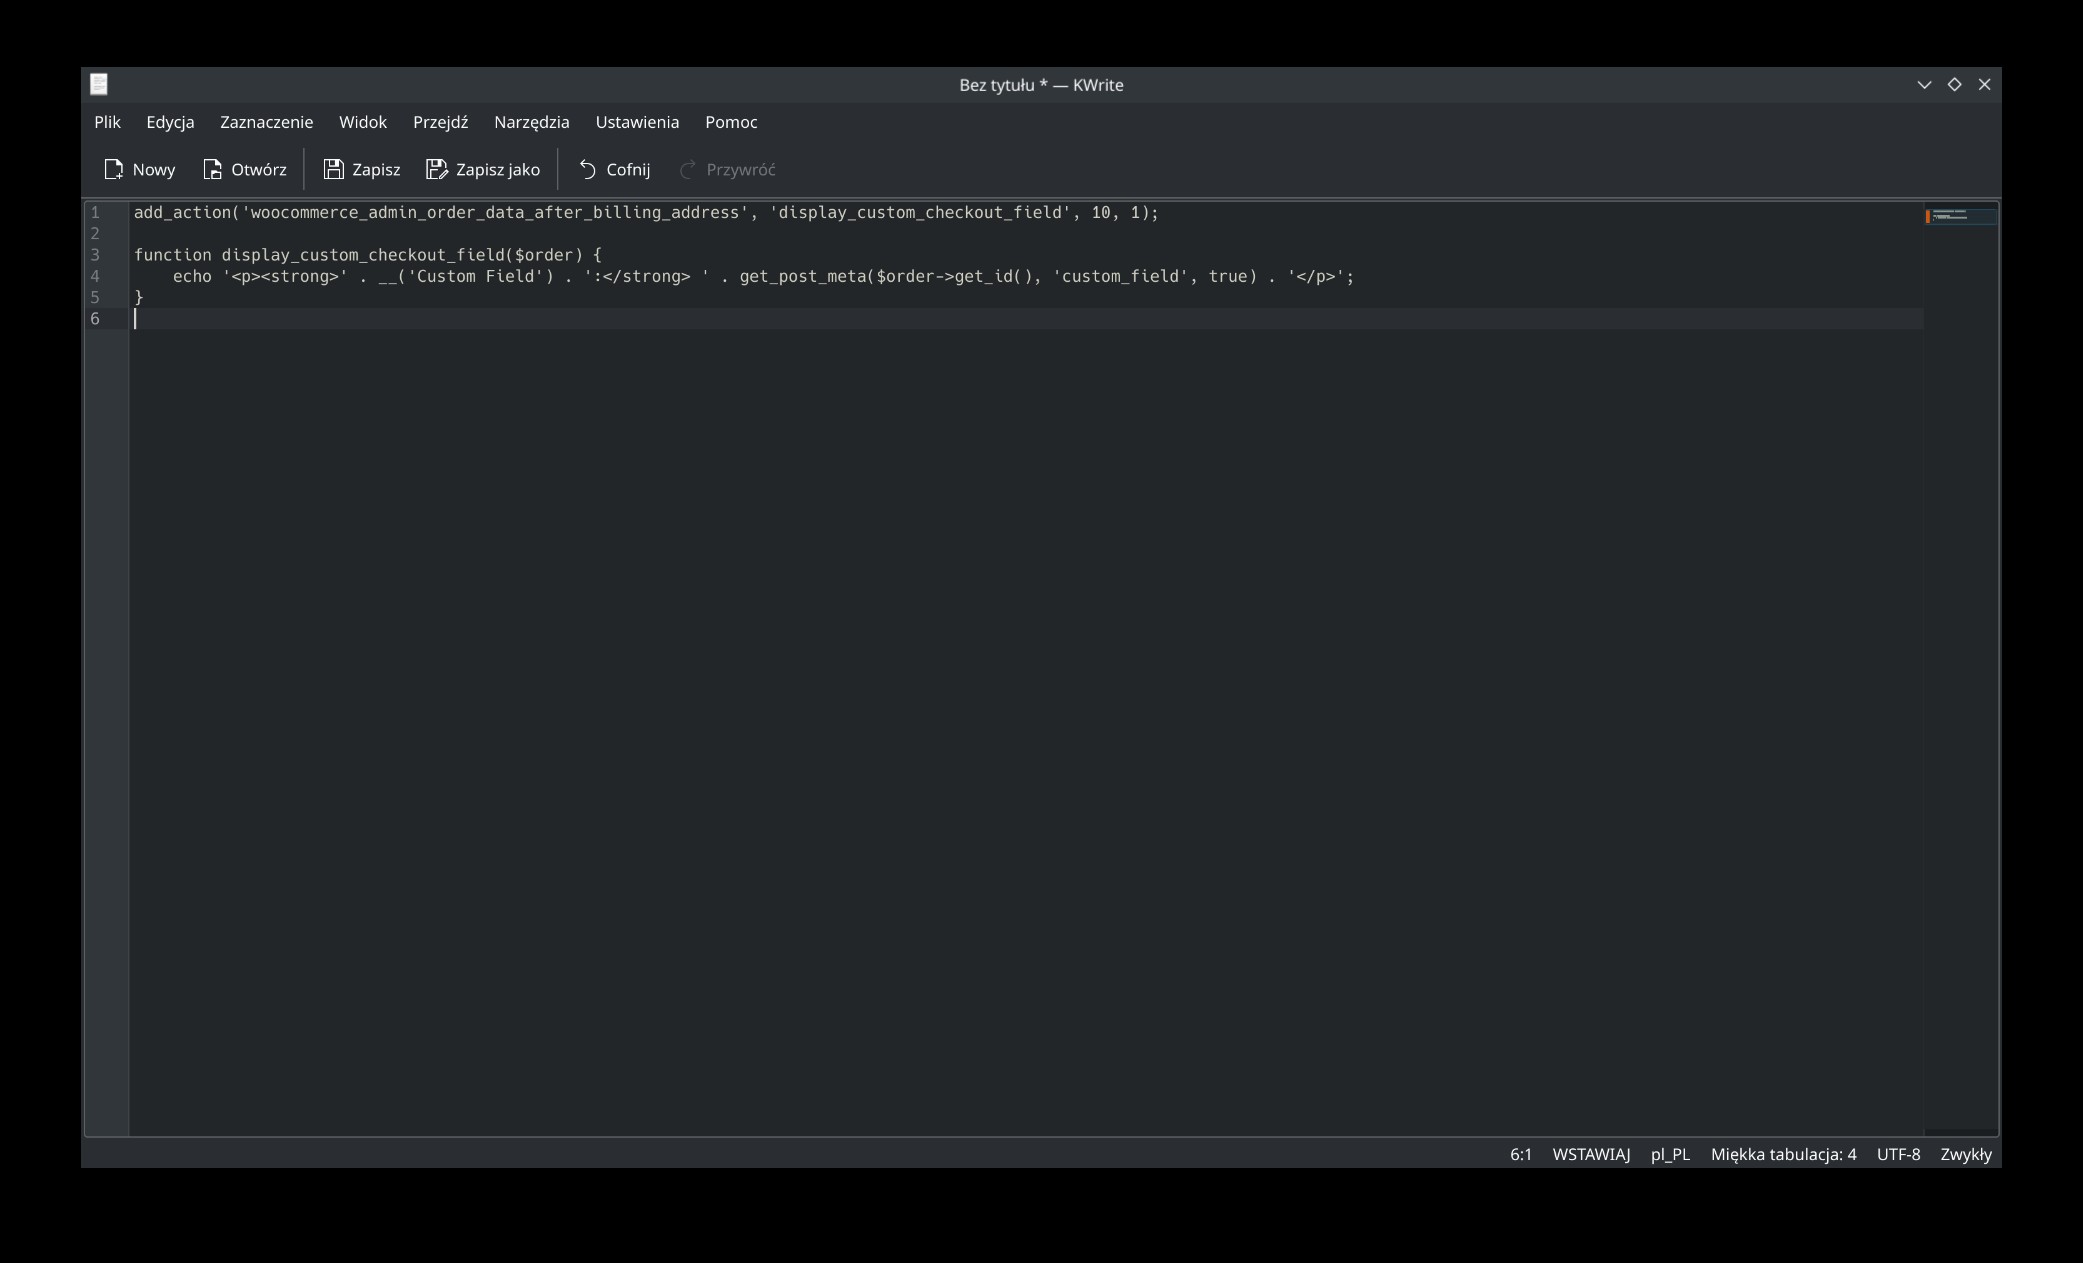
Step 3: Display Custom Field Data on Admin Pages
To display this data in the WooCommerce admin order details page, add the following code:
Method 2: Add a Custom Field to WooCommerce Checkout Using Plugins
If coding isn’t your strong suit, plugins offer a simple alternative. Here are a few popular plugins to add custom fields to WooCommerce checkout:
- Checkout Field Editor for WooCommerce (by ThemeHigh): Offers drag-and-drop functionality.
- WooCommerce Custom Fields: Advanced options for adding and managing custom fields.
- Flexible Checkout Fields: A beginner-friendly tool with powerful features.
Step-by-Step Plugin Guide:
- Install and Activate the Plugin: Go to
Plugins > Add Newand search for your chosen plugin. - Configure the Custom Field: Navigate to the plugin settings (usually under WooCommerce > Checkout Fields).
- Add the Field: Choose the field type, label, and conditions.
- Save Changes: The custom field will now appear on your checkout page.
Method 3: Add a Custom Field with Page Builders
If you’re using a page builder like Elementor or WPBakery, you can often add custom fields without plugins or code. Look for WooCommerce integration options within the builder and follow these steps:
- Open the checkout page in your page builder.
- Add a new form element.
- Configure the field settings (label, placeholder, etc.).
- Save and preview your changes.
Best Practices for Adding a Custom Field to WooCommerce Checkout
- Keep It Simple: Only add fields that are necessary to avoid confusing customers.
- Ensure Responsiveness: Test your custom fields on mobile devices.
- Test Functionality: Verify that data is saved and displayed correctly.
- Follow Privacy Laws: Avoid collecting sensitive information without customer consent.
Frequently Asked Questions
Can I add conditional custom fields to WooCommerce checkout?
Yes, you can use conditional logic to show or hide fields based on customer choices. Plugins like Checkout Field Editor support this feature.
How can I style the custom fields?
Use CSS to style custom fields. Add classes to your field and define the styles in your theme’s stylesheet.
Can I add custom fields for specific products?
Yes, use hooks or plugins to add product-specific fields to the checkout process.
Conclusion
Adding a custom field to WooCommerce checkout is a powerful way to tailor your online store to customer needs. Whether you choose to add a custom field using code, plugins, or a page builder, this enhancement can significantly improve user experience and boost your store’s efficiency. By following this guide, you’ll be well-equipped to make the most of WooCommerce’s customization potential.
Remember, optimizing your WooCommerce store for user experience can translate into higher sales and better customer satisfaction. Start today by adding a custom field to WooCommerce checkout!